For information on the programming parameters and what they do you should check out The Hackers Guide to Programming the BBS02 located here.
UPDATE: The BBSHD is programmed in the exact same way with the same software as the BBS02. Just make sure you set the Limited Current (Amps) to 30 not 25 which is the most the BBS02 can handle.
I’ve watched this thread on Endless-Sphere and spent a few hours building several of my own cables (as shown here) using different USB\Serial adapters bought on ebay and BBS02 extension display cables from EM3EV. If you want to remain sane and not waste a lot of your life beating your head against the wall I would recommend you just buy this cable for $25 from Matt at EMPowered Cycles or this cable for $20 from Lunacycle.com. It is by far the cheapest programming cable have seen for sale purchased directly from Bafang, they seem to work flawlessly with Windows 7/8/8.1. It is plug and play not ‘plug and pray’ like your cheap crappy homemade cables will be.
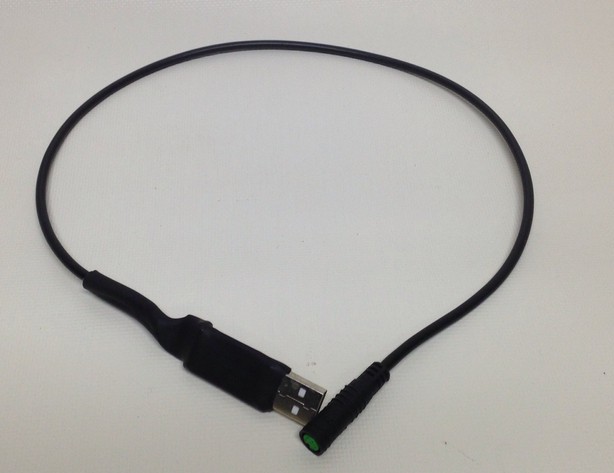
Looks pretty Ghetto and is oh-so-short but it works every time with Windows OS and only $20-25, What a deal! Hey, it’s not the size that matters… (that’s what my wife keeps telling me)
An important note, programming your controller will immediately void any warranty from Bafang. Don’t expect to make ANY changes to your programming and expect ANY dealer to refund or replace your blown controller, EVER. It’s just not fair to them.
Manufacturers of ebike motors walk a delicate line between making their drive motors configurable (even at risk to bad variables being entered) and completely locking down the system. Bosch has chosen to go the latter route and does not allow anyone other than Magura in the US to change anything on the units other than tiny changes like increasing or decreasing the wheel size slightly to account for different sized tires on the same sized rim. Bosch will never get a dime of my money, you can find out why halfway down this post.
There are 2 schools of thought on programming the BBS02. One school is represented by Paul (cellman) from em3ev who believes that you should make only minor changes to the software such as
- Allow higher powered throttle at any PAS level
- Allow throttle at PAS level 0 so you don’t have to disconnect the PAS entirely to use throttle only
- Low voltage cutoff
- Amps to the unit
Quotes from Paul about the much contested PAS system
“The PAS level should be used to set the pedal cadence. Just because it’s set to 9, does not mean it will pull more power (although it likely will of course), but if you pedal fast enough and hard enough to do much of the work, the kit will not provide much power. PAS works like a switch on the BBS02. It does not adjust as you pedal faster or slower. When you set the PAS level it fixes the speed and it does not want to rotate at a speed much lower than that, or even accelerate smoothly to that speed.”
The other school of thought held by many members of Endless-Sphere is that you should be able to change most any feature or variable you want to although we are literally wandering around in the dark since it’s not even clear what many of the variables even do. It is quite common for people to set the Limit Speed % on every PAS level to 100%. This seems to be a good way to destroy your controller and really drives Paul crazy. There is no programming manual and while Bafang does not prevent you from programming the unit, they certainly don’t seem to be encouraging it either. It seems clear that they never intended for the end users to be programming their own controllers, only ebike ‘dealers’.
Many people dislike the way the PAS system works, as the PAS level is basically a switch to set the pedal cadence and assists MORE the LESS you pedal and assists LESS the MORE you pedal. This seems to be counter intuitive to many who want the unit to offer more power the more you pedal. This means if you want the drive unit to provide more power on a hill you actually have to shift UP not DOWN to select a higher speed and a lower pedal cadence (or lower the PAS system to select a lower cadence as well as a lower power setting). This is not only counter intuitive, but also risks controller overheating as the biggest problem that I’ve found with the BBS02 is that they tend to overheat and fry mosfets when the pedaling cadence is too slow and the hill is too steep. The best way to keep your controller from overheating is to fit the right size chainwheel on it for the hills you plan to climb and consider upgrading the crappy mosfets the controller comes with.
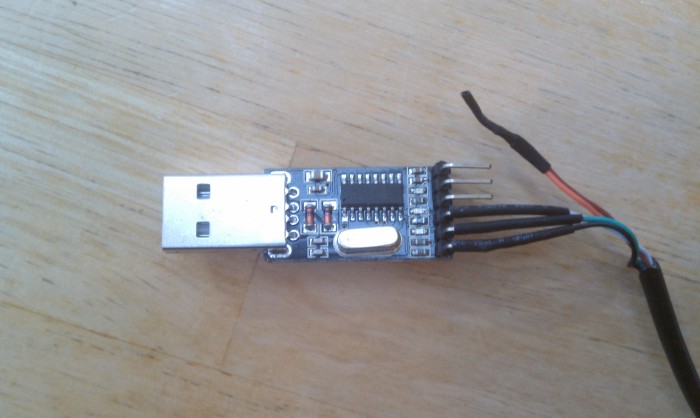
Wow I really can’t help myself, can I? Neat little leds that show power and send/receive covered up by that pesky heat shrink tubing.
I follow Paul’s school of thought, mostly because I buy from him and I trust his judgement. He has spent thousands of dollars replacing customers who reprogrammed their controllers, then fried them and expected free replacements. I just don’t karmically want to be one of those people.
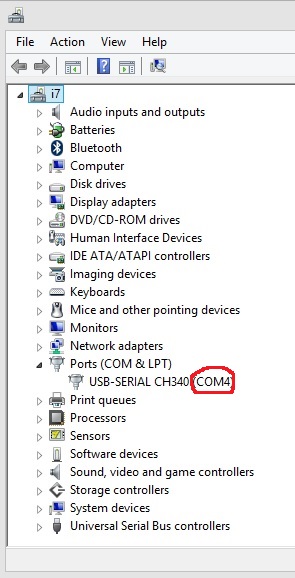
To program the unit you’ll have to plug-in the USB cable (but don’t hook it up to the bike yet) and wait a few minutes. Then browse to the device manager in CONTROL PANEL->SYSTEM->DEVICE MANAGER and look for the com port under PORTS (COM & LPT) as shown below. If you can’t find it just flail around awhile, it will magically appear or maybe you’ll just end up destroying your computer.
Once you figure out the com port you will need to download this file, then rename it to .zip and then extract it somewhere convenient. If renaming it isn’t working right it might be because your windows OS is hiding the file extension. To turn that off go to control panel -> folder options -> View and turn off ‘hide file extensions for known types’. You’re looking for the file controllerst.exe . Make a shortcut to your desktop, that will make it easy to find when you need it. Load that program and then TYPE in the com port that you discovered in the device manager. For this example it would be COM4.
UPDATE: A Bulgarian hacker living in Norway named Penoff used the source code and completely rewrote the Bafang programming software. All the settings are the same but the software that Penoff has written fixes a lot of the annoying bugs (like the com ports not showing up properly) and works the way the original Bafang software SHOULD have worked. I’ve tested it pretty extensively and emailed back and forth with Penoff who seems to be a stand up guy. If you want to download his application you can do it through his website here. You won’t be disappointed.
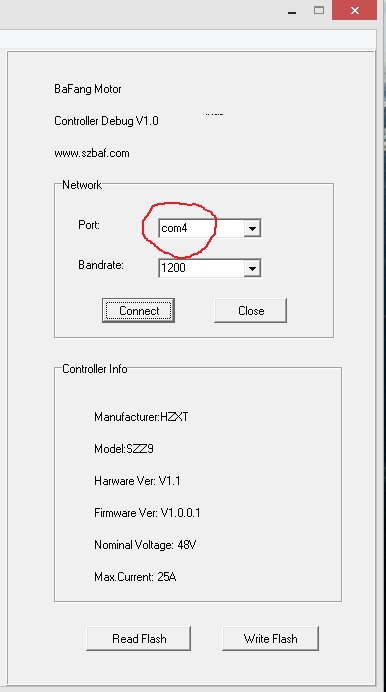
Looks like a drop down box right? But it is not. You will have to type in your com port you discovered in the device manager.
The controller Info should fill in under the com port but the settings on the left won’t come up till you hit the READ button (not the READ FLASH button).
Now hook up the bike and the battery to the BBS02. Plug the USB wire into the green display port adapter, make sure your arrows line up, the connector is keyed.
Once you hit the READ button the setting for your controller should fill in the current page, You must click read on each of the three seperate pages to load the settings for that page (BASIC \ PEDAL ASSIST \ THROTTLE HANDLE)
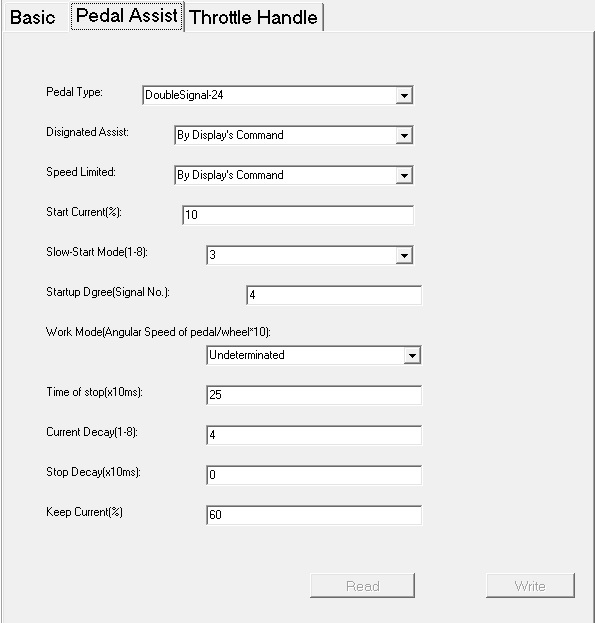
There is a lot of different settings you can mess with as shown in the thread on ES about programming the controller. Here are the settings that my most recent BBS02 come from Paul pre-programmed with. To save the settings you must also click WRITE on each page as you change the settings, it won’t write the settings for the page you are not on.
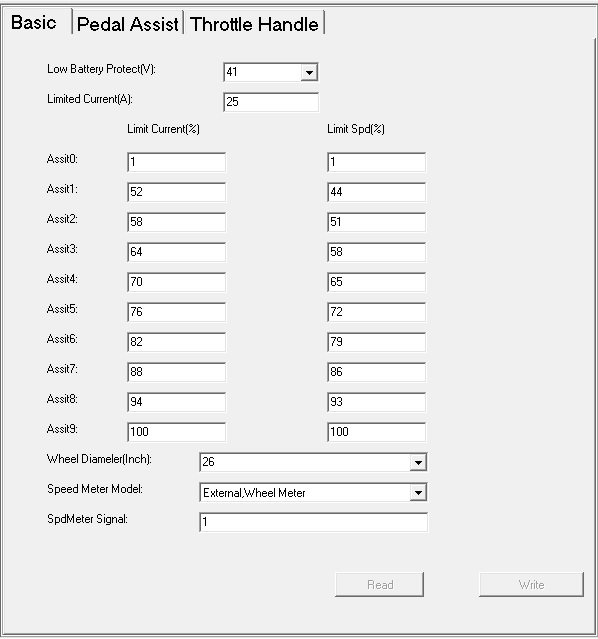
Em3ev settings. I change the wheel diameter to 18 so that the kph reads as mph, change anything other than the Low Battery Protect and Limited Current at your own risk.
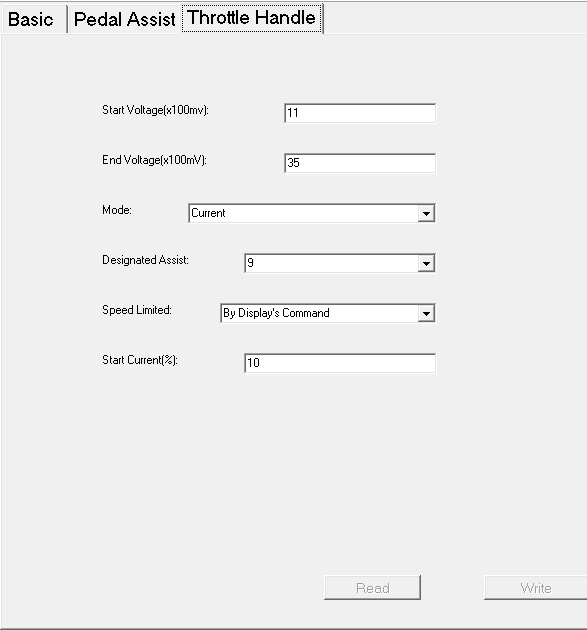
Em3ev settings. You can ignore the speed limited command here as the throttle ignores it anyway. I set the “Designated Assist” throttle power to display command so that I can set different throttle power levels by setting a higher PAS level with the PAS disabled. If you want max power on the thumb throttle just set the Designated Assist to 9.
I have lots of hours on these controllers with no failures, so these are the settings I would use. The only settings I would change are the Low Battery Protect (v) which is useful if you are using a pack without BMS and limit current which will limit the current to the controller in Amps. You should match the limit current to the Continuous Amps rating on your BMS. Be aware that often times Chinese battery companies tend to exaggerate their continuous Amps ratings, so when in doubt, use a lower number and slowly work your way up.
For anyone who cares here is a more technical description of the battle going on inside the controller by someone who is a lot smarter than I am on ES (probably better looking too).
Without phase current limiting there is no way to guarantee a motor will not overheat. You rely on the operator keeping the motor at a reasonably high rpm or minimising voltage applied to the motor at low motor speeds. The best a seller can do to avoid overheating is to keep the Limitspd% low so that little current is applied at low cadences but for an operator who avoids low cadence for more than a few seconds this is bad because the motor will provide no power at normal cycling cadences. An operator that keeps pedaling cadence in normal ranges, above about 60 rpm, with the BBS01 will never overheat the motor but an operator that lets motor speed drop below this risks overheating the motor with a wide range of controller settings. This would go away with phase current limiting but the BS0X doesn’t have that feature. The seller suffers potential warranty claims if the Limitspd% is set high but the operator suffers poor performance if the Limitspd% is set low. The current to the motor is also affected by “Keep Current(%)” and Current Decay (1-8)”.
Basically it means if you are climbing a hill you need to have a high cadence level if you want more power and your controller to not fry. I suggest using the thumb throttle on hills (not just the PAS) and shift into a low enough gear that is either too fast (or almost too fast) to keep up with pedaling. As long as the motor is spinning pretty fast the controller should never burn out regardless of how steep the hill is. If you can’t set the gearing on a hill so that you are pedalling fast to keep up then you need to install a smaller chainring for that bike (and lose a little of your top speed).
Here is another trick to bypass the speed limiting on the BBS02 from the thread on ES
For effective unlimited speed, change your wheel size to make mp/h show as km/h.
I.e. if you have a 26 inch wheel, set it as 16 inch wheel in the display (i.e. 26/1.61 = 16 – 1.61 is also roughly the same ratio as km to miles, as in 26km is 16miles). After making this change, then 25km/h on the display will in actual fact be 25mph in reality. No BBS unit is capable of 50mph, so it’s effectively now unlimited (or more accurately, speed limited by max current).
For most fatbike tires you would want to set the tire diameter to 18 (the 26″ tire is closer to 29″ because of all that extra rubber. 29/1.61 = 18)
A lot of variables like tire size and the number of PAS levels that are displayed can also be programmed through the display without the use of a programming cable. To set these parameters you need to look at the user manual for the particular display you have. These can be found here.
Thanks to everyone who spent countless precious hours of their life trying to figure out how to do this and leaving behind a heart-breaking 37 page thread. Our knowledge is built on your blood, sweat, and tears … and your piles of dead controllers.
Ride On.
Update: Had some intermittent problems with the cable after a bunch of uses and re-soldered the connections and the problems went away. Matt seemed happy enough to send me another one but I like fixing (and breaking) stuff. I also soldered the ground connector on the other side of the USB connector that was not soldered to reinforce the circuit board. I also built a 9 pin serial cable out of an old BBS02 display extension cable and a serial extension cable I had laying around. A bunch of BBS02’s I bought from BMS battery were set to 18 amps even though I specifically requested 25 amps. I only recommend buying Chinese motors from Paul at em3ev, everyone else in that country is just impossible to deal with.



dissertation outline help essay community service car service centre business plan help with intermediate algebra homework
30 mg sildenafil https://eunicesildenafilcitrate.com/ generic sildenafil for sale in canada
[url=https://mypsyhealth.ru/services/vyzov-narkologa/]нарколог на дом Москва[/url]
zithromax tablets https://zithromaxes.com/ zithromax indication
what is alprostadil used for https://alprostadildrugs.com/ alprostadil suppository injection demonstration